
I Love Transit: LEGO my SkyTrain!
I Love Transit: LEGO my SkyTrain!

For 80’s kids (and decades either side), LEGO was a way of life.
You’ll remember building the next Empire State Building, CN tower or the complete Star Trek Enterprise and, of course, the sound your parents made as they stepped on the extraordinarily painful blocks!
William Fong was a childhood fan as well but didn’t actually buy LEGO until he decided to make a SkyTrain!
We got a chance to ask Will some questions about this intensely detailed project.
Take a look!
What made you want to make a SkyTrain?
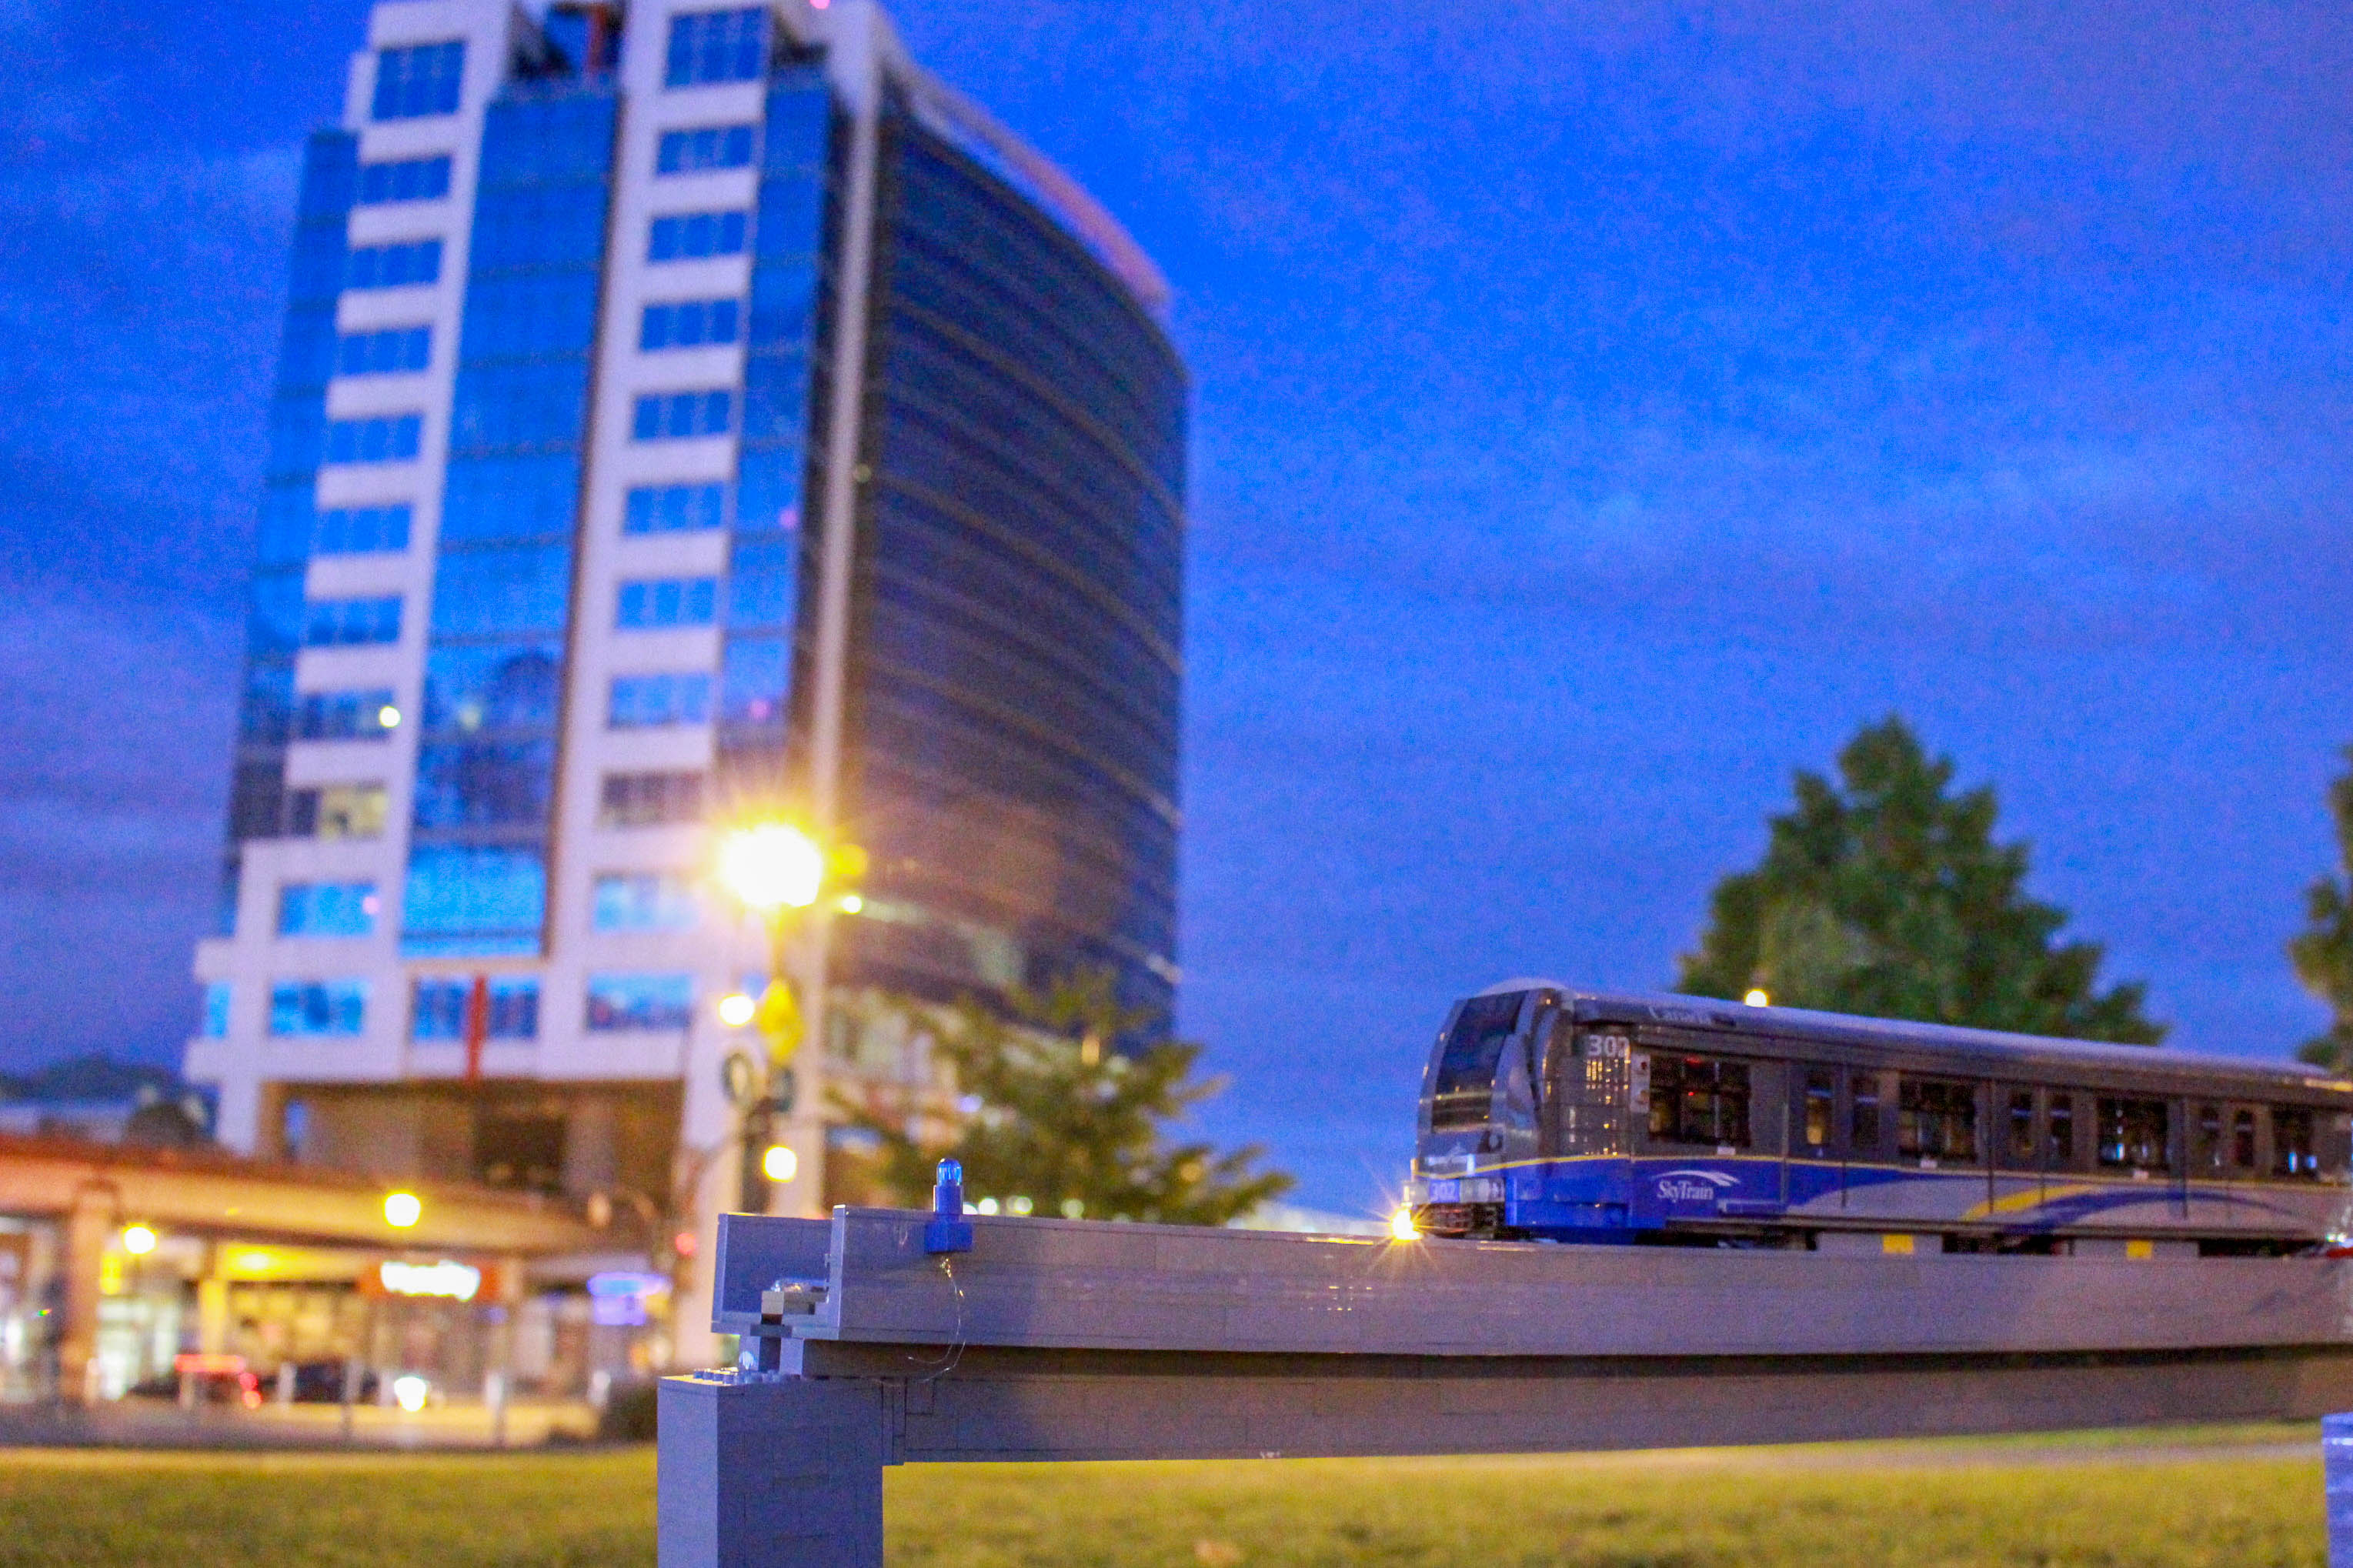
As someone who is a daily user of the transit system, and as someone who has a minor interest in design in general, I found that the 2009 Skytrain stock extremely intriguing. It’s the most modern and well designed piece of equipment in the fleet (although Xcelsiors are pretty excellent buses and the new Bombardier 300’s probably trump that claim, too).
The colour scheme of the exterior and interior, streamlined shape as well as adding user friendliness, like destination boards, updated system maps, better seat layout and air conditioning. Everything was done right on the 2009 trains!
I think the main reason I wanted to recreate some of the great design features in LEGO was because I had the passing realization that there were some new LEGO pieces that had striking resemblance to the angles on the trains. I designed the LEGO train mostly around the windscreen due to its identical curved shape to the real life train. I didn’t start building it until I was satisfied with the accuracy of the curvature of the roof as well as finding a way to have doors that could slide open. I also chose this specific train because of the number of seats. Three seats and an aisle is about as wide as you can make a train in LEGO before it starts looking too wide.
The details are so perfect, how did you get the stickers and other minature details of the actual train ON the LEGO model?
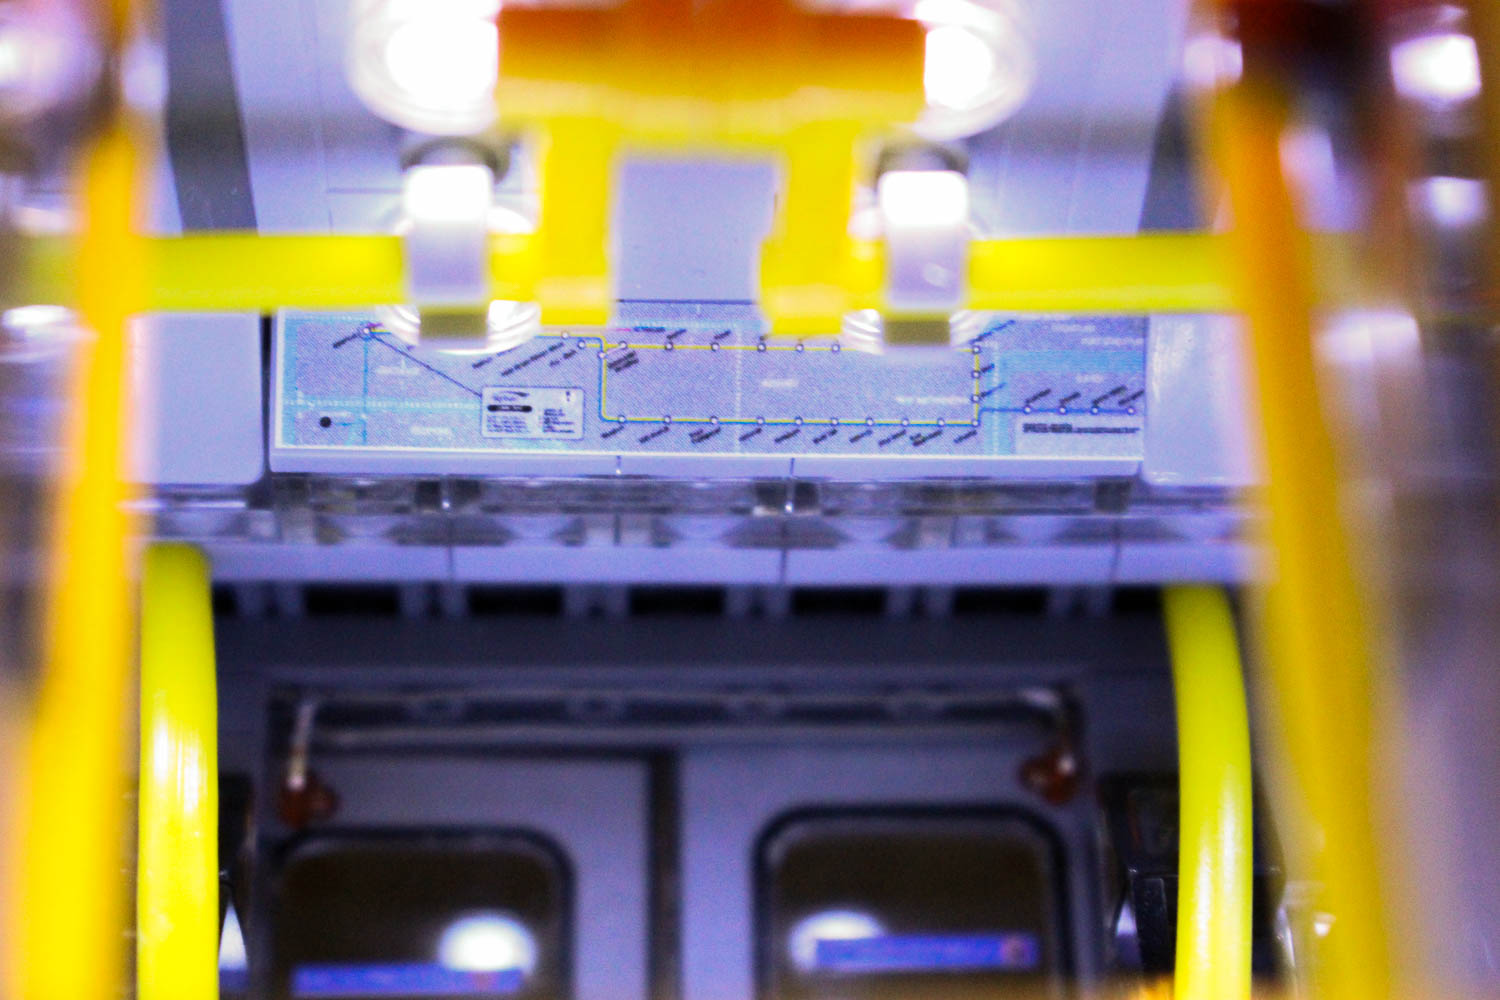
I made the stickers in Photoshop. Interior graphics like the system map and the safety and security sign were entirely drawn from scratch using photos as a reference. I didn’t want to print photos as stickers because they didn’t scale to the LEGO very well.
The exterior livery was based off of and extremely altered from the information sheet that was shown alongside the 2009 presentation of the new Mark II stock, which I found online. The corporate and government logos as well as official fonts were found on the internet. I then sent the artwork off to a printing company named Model Decal Depot at Adlion Printing to have the graphics put onto vinyl stickers. The stickers are especially important because they complete the train more than people may realize, mostly because the doors are stickers that have been applied onto LEGO window panes.What are some of the cool features of your model?
The model is as accurate to real life as I could build it. It has an identical seat count to its real life counterpart. Curved handrails, which may not seem remarkable, but when building out of lego, it is! It has an articulated corridor joining the two cars. It has the same number of ceiling lights as in real life. Orange “Door open” lights in the door jambs that can be toggled on the left or right doors. The doors can also be slid open and are not just decorative placeholders. Directional lights, so that when the headlights are on at one end of the train, the taillights are on at the opposite end. The advertising boards are illuminated using something called electro-luminescent tape (a strip of copper that is coated with phosphorus and glows when an alternating current is applied to it).
It’s also not just a stationary model. Each train is also powered by two 9V DC motors, so it can move along track. Hopefully by next BrickCan, I’ll have built enough elevated guideway for it to run a decent length.
How long did it take you to create?
I think I finished the digital model in 2011. I wasn’t satisfied with the accuracy until late 2013 and held off building it until early 2014.
The digital model continued to go through several revisions which slowed me down, but it was mostly the cost of the model that made me build it on and off for a while. Building one car was costly enough, but when I found out that there was going to be a LEGO convention in Vancouver, I decided to spend the extra money and twin the first car and build some overhead guideway for it to sit on. It wasn’t right up until April 2016 during BrickCan that I completed both cars and the two sections of track.
Technically, I’m still not done yet. I just finished gutting and reinstalling all of the electronics this month. I want to reprint the stickers to more closely match some colours in the livery as well as correct some inaccuracies. I’m also going to install digital destination boards, although I’m running into technical issues with the hardware for that right now. Maybe later on, I’ll also install speakers inside the train, too.
How many pieces are involved?
Each train car has approximately 1900 lego pieces and 60 LEDs. 2000 pieces for the track and supports.
Have you done any other notable Metro Vancouver model recreations?
This is my first ever model, but I am planning to build others in the future. Next one might be a trolley bus from Vancouver’s not-too-distant past. I’m also trying to figure out how to recreate the new Innovia 300, but it’s been tough to get started because the angles are so different.
What is the most complicated project you’ve made out of LEGO?
This train. From trouble shooting how to cram in all the wires to trying to find workarounds for discontinued and extremely expensive pieces, it was a headache. Not to say that I won’t build something again. Maybe just something cheaper that is less technical. At least I semi-know what I’m doing now. Prior to this, I hadn’t picked up a soldering pen since grade 8.


Thank you to Will for letting us share his fantastic (and extremely detailed!) SkyTrain model! We can’t wait to see what he blocks up next.
Author: Adrienne Coling